
Word 2016 Track Changes User Guide
Track Changes User Guide
This Word 2016 Track Changes User Guide is intended to provide you with all the information necessary for reviewing the changes made to your edited document.
When you receive your document from us, you will find that it has been marked up using the Track Changes feature of Microsoft Word. The instructions provided here will walk you through the steps of how to move from the marked-up, Track Changes version to the final, clean version by accepting and rejecting the changes and removing the inline comments.
Got a dream to achieve?
Click on the Review tab located at the top of the screen.

In the toolbar that appears, you’ll see a menu toward the middle with four options:
Simple Markup, All Markup, No Markup, and Original.

Choose All Markup to view your original document with the editor’s changes and inline comments distinguished in red and blue. Insertions will be in blue within the text, while deletions will be in red with a line through them (strikethrough), and comments will appear in balloons in the right margin, with lines indicating where they refer in the text. NOTE: The colors and font styles of insertions and deletions, and the colors and locations of comments may vary depending on your computer’s settings.
NOTE: Before moving on to this step, make sure the Track Changes button in the middle of the Review panel is not highlighted. If it is highlighted, any changes you make to the document will appear in color, as if they, too, were tracked changes. In the image below, the Track Changes button is highlighted.


Use the Previous and Next arrows to highlight each insertion, deletion and comment one by one.
Once an insertion or deletion is highlighted, decide whether you want to incorporate it into the document. If you want to accept the change, click the Accept button and the change will be accepted into the document. If you prefer to reject the edit and keep the text as it was in the original, simply click the Reject button.
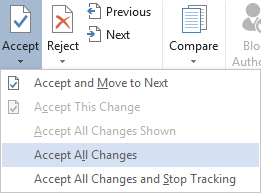
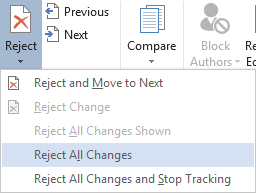
If you would like to accept or reject all changes in the document all at once, click the arrow beneath the Accept or Reject button, and select Accept All Changes or Reject All Changes, respectively. The image below shows the option of accepting all changes.
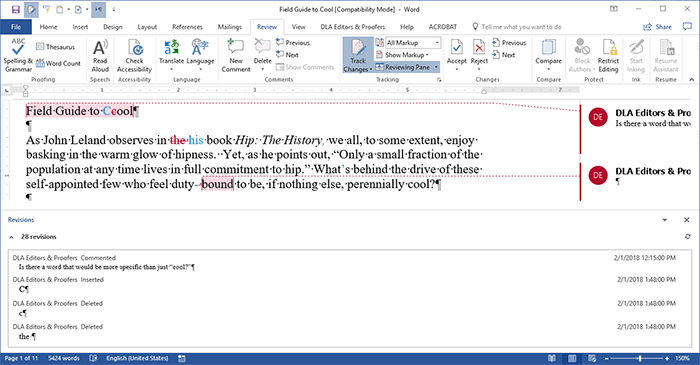
NOTE: If a lot of text has been inserted or deleted, you may find it helpful to click the Reviewing Pane button. This will give you the option to view the full lines of text that have been inserted or deleted. The Reviewing Pane is open horizontally at the bottom of the screen in the example below.

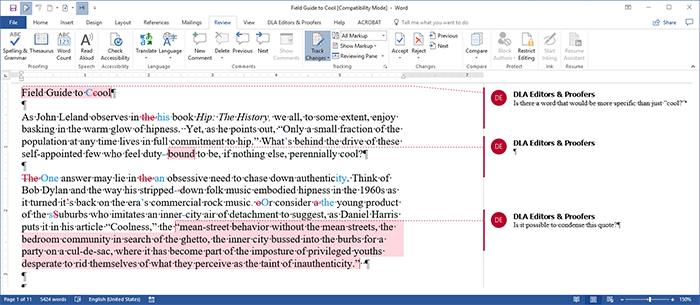
Comments are located in the right margin (depending on your computer's settings). These comments include our explanations, questions and feedback your document. They are intended to point out areas of concern, or perhaps even issues we were not able to correct, for you to address. Each comment points to the text to which it corresponds. See the example below.
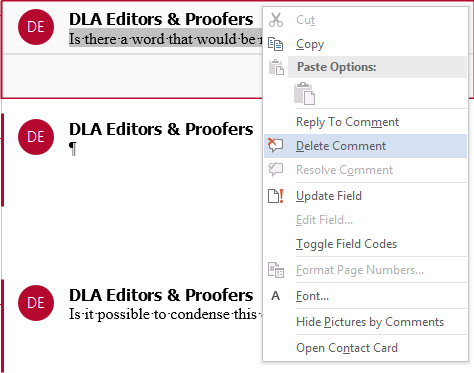
Once you have read a comment and are ready to delete it, simply right click on it and select Delete Comment from the pop-up list, as shown in the image to the right.
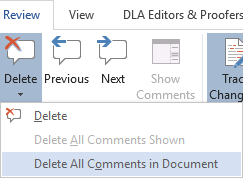
If you would like to delete all comments in the document all at one time, click on the arrow below the Delete button and select Delete All Comments in Document, as shown to the right.
Once you have finished accepting and rejecting changes and have deleted all the comments, save your work!
If after reviewing this guide you still have questions regarding Track Changes, please do not hesitate to contact us, and we will be more than happy to answer any questions you may have.
